Word (2010 and up) How to add a custom dictionary
Use one of the following methods to add a custom dictionary.
Method 1: Create an additional custom dictionaryTo create an additional custom dictionary, follow these steps:
1. Start Word.
2. In Word, click
File, and then click
Options.
3. In Word, click
Proofing, and then click
Custom Dictionaries under
When correcting spelling in Microsoft Office programs.4. Click New to create a new custom dictionary.
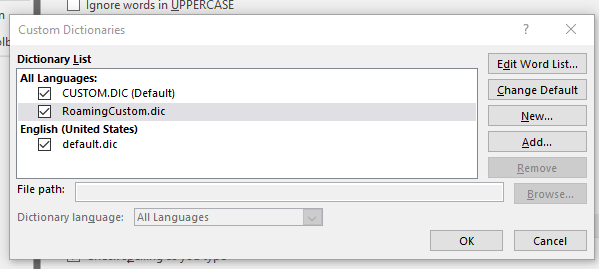
5. In the
File name box, type a name for the new custom dictionary, and then click Save.

6. The custom dictionary is added to the Dictionary list. The location is:

7. In the Custom Dictionaries dialog box, click OK, and then click OK in the Options dialog box.
THEN create Method 2: Import an existing custom dictionary from another computer.We use the login profile batch file to do this (and other things):xcopy "\\FILESERVERNAME\FOLDERNAME\NAME.dic " "%userprofile%\AppData\Roaming\Microsoft\UProof" /y
WE put the created custom dictionary in a network folder, and then use the xcopy command to copy it to each users’ computer in the above spot whenever they login. SO – this dictionary can be added to and changed by ONE person as and when needed
However - on EACH Computer the user needs to start Word
1. In Word, click
File, and then click
Options.
2. In Word, click
Proofing. and then click
Custom Dictionaries under
When correcting spelling in Microsoft Office programs.3. In the
Dictionary list box, click the custom dictionary that you want to import and make sure there is a checkmark beside it to enable the dictionary and to use it for spelling checker functionality, click to select the check box next to the dictionary name.
#TipOfTheWeek